Knot Bead Embroidery!
To Knot or Not, in Bead Embroidery

Do you knot bead embroidery?
That is indeed a question. Traditions in both fine embroidery and much of leather embroidery neither begin, nor end with a knot; understandably, smooth work is the goal. In bead embroidery one considers the weight of beads and if beading a garment, the stress of being worn. There is much creativity among beaders regarding materials and how to stabilize to support the weight of beads. Regarding beginnings and endings, the question often becomes not whether to knot or not, but
when to knot.
This is a
Fussy Opinions
essay; see
Understanding Bead Embroidery Instructions.

What does that mean? If you are happy with your bead stitch technique you can forego this discussion and jump directly into bead embroidery patterns, or enjoy this interlude regarding if and when to knot bead embroidery!
Good reasons to knot bead embroidery
- The beads stay put: go dance in that dress, shimmy that bead fringe, or use that beaded quilt.
- Choice of fabric: knot to secure beads on a knit or loose weave. And of course,
- Minimize bead loss: should something catch or unravel. If the beads are (at least periodically) knotted, only a few will be lost and the bead repair will be minor.
One may choose to knot at the beginning of a bead line, at the end of a motif, and perhaps at each bead (if beads are spaced too far apart for minor thread jumps).
Good reasons to start any embroidery without a knot
- The work will be secure without one or,
- Have greater control over a bead stitch by knotting later.
(Scroll down to see Starting Without a Knot)
Confusing? Yes, in the beginning, but any media with such a wealth of materials
and opportunity for creative independence will have rules and also progressive reasons to break them! When you enter a sewing circle (or beading bee) and all members wag fingers and shake heads, take notice. This is not to stop your creativity but to learn why experience causes them to think the edge of the precipice spells disaster or invokes success. Once understood, you'll make informed decisions, and maybe shock everyone with your own technique (sprout wings and fly!)
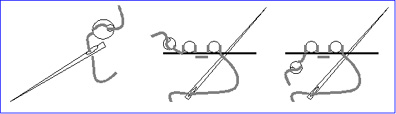
Starting with a Knot
Simple knots can begin above or below the fabric. Our fussy opinion is to secure any knot with an additional backstitch before adding beads. When beginning on a knit fabric (particularly a sweater knit) I like to back stitch first then bring the two ends together to tie a knot. Why? Because my threads are knotted around the fibers, rather then depending on the density of the knit to hold the knot.
While stitching, you may wish to anchor with a knot and this need not be complex. A backstitch, a simple overhand knot (and perhaps another backstitch) will send you on your way.
Because of the superb diversity and marvelous opportunities to mix stitches, weaves, materials and beads, we've included some other favorite knots.
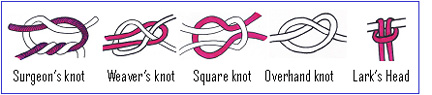
Yes, these knots go beyond a simple stitch, but bead embroidery can have beads added in many ways. We knot bead embroidery to hold fast, and may need to splice (marry two threads together). We use binding knots that hold tension (around a bead, bundled fabric or object,) or a use a knotting bend that temporarily fastens.
Why knot bead embroidery?
To keep the beads secure. I agree that most embroidery does not require knots. One might add in beads without knots, and Wearable Art may be quite successfully created without knots. But our Fussy Opinion is to knot bead embroidery (heavier leather embroidery excepted), because beaded garments are usually worn, not always gently used, and are (sometimes) laundered. Knot bead embroidery?
Yes indeed! Freedom to dance in that garment is well worth a knot.
Beads are stitched on cloth or beads are worked on other beads, or beads may be incorporated with other materials. The beading line may be thread, floss, sinew or cord; it may be of a natural or artifical fiber, filament, or it may be of wire and in any number of gauges, twists or weights. Some materials work best in short lengths (Kevlar thread and Silk Ribbon come to mind) creating the need for more starts and stops. Knotting is needful, and knowledge of knot tying can help in bead embroidery, can assist in understanding knots in other beadwork, and even encourage ornamental knots into your creations.
Where can you learn about Knots?
Knots common to sewing with beads, bead-weaving, and bead embroidery are not separate or different than those used for heavier occupation, they are just tied using leaner materials. The same concepts hold or slip or splice if tied correctly. As you read a bit about knots and knot tying, you may notice recurring ideas and perhaps even remember some knots from Scouting, camping, or just working with rope on land or sea. Learn a bit from our knotty shipmates and secure those beads! It may just spark additional interests in (the old rough or new sleek styles of) macrame, the extraordinary variety of decorative knotcraft, leather braiding or Kumihimo, all of which can be worked with beads.
International Guild of Knot Tyers
is an educational non-profit making organization dedicated to furthering interest in practical, recreational and theoretical aspects of knotting.
Peter Suber's Knots on the Web
Mr. Suber knows that "a good practical knot is both a nugget of hard-won technology and a thing of beauty." Whether the knot is seen or not, we agree.
Ian Fieggen's Shoelace Site
because it is clever, helpful and has great illustrations.
Consider also:
Carol Wang's Chinese Knotting
A doorway to wonderful decorative knots with full directions online! Just like the referrals above, there is no embroidery information here but once one is knot savvy, knotting for ornamentation seems a natural progression.
Adding beads to embroidery stitches is also a natural progression. There are many excellent stitch dictionaries and exciting books on specialized embroidery that can get you started.
Bead Embroidery books
and those on
Netting and Tatting (with beads),
are also a good start. You can see our recommendations on our
Beading Books
pages. Check book suggestions at all your favorite bead sites, as each list their favorites.
Why learn more about Knotting?
Because, not only will your beads stay put, but also you will grow in confidence! Finding time to bead can be challenging enough. Knowing your fiber knot or spliced beading thread will hold when you have invested a high number of precious hours is delicious. Knowledgeable knot tying may provoke interests in knotting beads into lace, or tatting or netting with beads or the satisfaction of knitting beads or working bead crochet. You could create knotted buttons (with or without beads) and certainly recognize if a lashing over the bonnet, trunk, or the top of the car is going to hold your purchase (fancy a
Bead Show?)
Floss and silk ribbon embroidery usually becomes sufficiently anchored by stitches once underway and thread tails are worked into existing stitches, becoming part of the design (or neatly slid beneath). I add beads on a separate thread (and knot) so not to pull out carefully puffed ribbons. Because of the weight of even a single bead, our Fussy Opinion is to start and end bead embroidery with some kind of anchorage, which may start with or without a knot.
Be sure to notice knots explained in your favorite bead patterns.
Starting without a Knot
Embarking without a knot may feel unwieldy, but if you experience problems with tension (that is, how the beads lie against the fabric), puckering (changes in tension along a bead-line) or unintentional smocking (fabric ripples or pleating around the beads), revisit these
no-knot-start concepts for managing tension between materials.
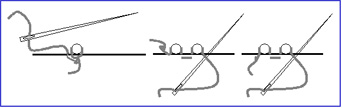
Anchor beads or waste beads will be familiar with off-loom bead weavers. They are used as temporary anchors for ease in beginning a stitch and are removed later. The anchor or waste bead is not part of the embroidery, but temporarily secures the start, which can be above or below the fabric. To create an anchor or waste bead, pass the threaded beading needle through a bead two times to temporarily secure the thread, leaving a tail of at least six inches. After the first motif, first few bead stitches, or at the end of the work, the anchor bead is released and the thread tail knotted and worked into the embroidery. Some artists may prefer to knot the tail unobtrusively above or below the fabric depending on the embroidery materials used.
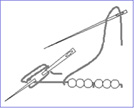
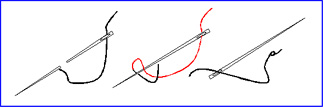
Roping off on an extra needle is common in bead embroidery, particularly with multiple needle techniques, such as two needle couching where the beads are on held on one line and stitched down with a second threaded needle. Couching techniques may use
Koma
(the goldwork spool) in the
Japanese Style
(Koma-nui) or other forms of placement assistance. To what I am referring is the simple straight pin or extra needle through your fabric near the start of your embroidery. Wind the end of the line (which has the beads threaded) several times around the pin to secure one end. This anchor gives you a third hand, freeing your own to begin the stitch. If you start without a knot in this fashion, the thread anchored by the pin will later be released, incorporated into the embroidery and knotted (above or below the surface).
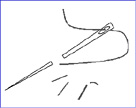
Back Stitch is a no-knot start common to working on leather and suede, but may also be a sufficient anchor in heavily beaded fabrics, perhaps with a added whip-stitch. If beading directly to a fabric garment, do consider knotting (see above). Make a few backstitches ending up at the point where you wish to begin beading. This is done perpendicular to the bead line and is easily covered by subsequent rows of stitched beads. When this is done in leather (or a thick) suede, you can feel the tension on the thread as you snug it down.
Do I knot bead embroidery? Yes (with few exceptions) either beginning with a knot, or choosing to anchor and knot after the stitch is established. I use knots to secure beads, to splice in thread, and to add in additional materials. Wearable art bearing the weight and substantial time investment of bead embroidery is worth learning a few knots and how to add them discretely. Practicing them with something larger than your beading thread (how about a shoe string?) to learn the in's and out's and notice when your favorite bead artists explain when and how they do, or do not, knot bead embroidery.

 The link to view Koma (above) is courtesy of
BerlinEmbroidery.com
Tanya Berlin very kindly offers critique and personal correspondence supporting purchasers of her sophisticated hand embroidery kits. As you work the fine embroidery (or goldwork, whitework, & more!) and wish to confer with the master artist, follow her directions for scanning & email for discussion. What a fine opportunity for skill building, mentorship and positive support!
The link to view Koma (above) is courtesy of
BerlinEmbroidery.com
Tanya Berlin very kindly offers critique and personal correspondence supporting purchasers of her sophisticated hand embroidery kits. As you work the fine embroidery (or goldwork, whitework, & more!) and wish to confer with the master artist, follow her directions for scanning & email for discussion. What a fine opportunity for skill building, mentorship and positive support!
|

| The link to Japanese Style is to the impressive
Japanese Embroidery Center
(JEC) located in Dunwoody, Georgia (USA). JEC is a nonprofit educational organization whose mission is to preserve and promote the cultural heritage of Japanese embroidery through the pursuit of Nuido, The Way of Embroidery. In addition to their superb classes in Japanese embroidery technique (described in their book), the JEC school (not the book) also offers several class levels in the fine art of Bead Embroidery. |

You have permission to link to this page, and you may print the publicly posted Bead-media pages for your personal, non commercial use. Learn more at
Copyrights for Bead Artists.
Return to top of Knot Bead Embroidery!